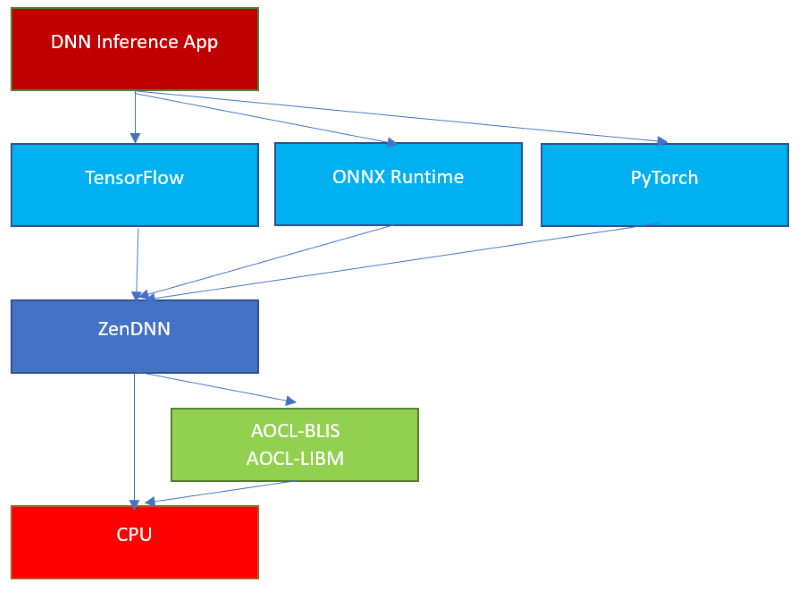
| PDF:https://www.amd.com/content/dam/amd/en/documents/developer/pytorch-zendnn-user-guide-4.0.pdf 岳麓区交警闯红灯有怀疑,请拨打电话:0731-88919130。 1)安装 conda create -n pt-v1.12-zendnn-v4.0-rel-env python=3.8 conda activate pt-v1.12-zendnn-v4.0-rel-env pip install --upgrade typing-extensions pip install --upgrade numpy==1.23.2 unzip PT_v1.12_ZenDNN_v4.0_Python_v3.8.zip cd PT_v1.12_ZenDNN_v4.0_Python_v*/ source scripts/PT_ZenDNN_setup_release.sh 操作系统版本: • Ubuntu 20.04 and later • RHEL 9.0 and later 2) 架构
3) CNN基准测试: 1. Follow the steps on JEMalloc installation (https://github.com/jemalloc/jemalloc/blob/dev/ INSTALL.md). 2. Export following environment variables: To install torchvision, execute the following command: For latency, execute the following commands: 1. cd PT_v1.12_ZenDNN_v4.0_Python_v*/ 2. source scripts/zendnn_PT_env_setup.sh 3. conda activate pt-v1.12-zendnn-v4.0-rel-env 4. bash scripts/pt_cnn_benchmarks_latency.sh For throughput, execute the following commands: 1. cd PT_v1.12_ZenDNN_v4.0_Python_v*/ 2. source scripts/zendnn_PT_env_setup.sh 3. conda activate pt-v1.12-zendnn-v4.0-rel-env 4. bash scripts/pt_cnn_benchmarks_throughput.sh 4) 就是不知道实际效果怎么样,有个脑壳痛 |


说点什么...